Sunday, 28 February 2010

One, Two, Three - It's Time for Mum

This is my third post this morning, only because I know I have tons of stuff to do over the coming days and I don't want to miss posting all the stuff I've been busy making.  So it seemed only fitting that this post is for the Raise The Bar challenge this week, which is: 'Three's Company! That's right - use increments of 3 anywhere on your card: 3 embellishment, 3 brads, 3 designer papers, you name it.'

I chose to add this challenge to the Digital Tuesday Challenge, which is: 'to make A Card For Mum this could be Mothers Day, birthday or just to say I love you, so this is my challenge to you, it can be a card or other project whatever you feel like creating but must contain at least one digital image.'

I've recently downloaded some vintage images from The Little Grey Bungalow. The images are taken from 1950s sewing patterns and I love them.  There is one in particular that reminds me of my mum, who used to sew many of her own (and my) clothes.  Mum is a very elegant lady, always well dressed, beautifully made up, and with great poise and presence.  This image really brings her to mind:


Image: Little Grey Bungalow, 'The 1950s 'Topper''
Papers: Crate Paper, Bazzill

This image was coloured with my Copics, and I'm really pleased with the result.  I knocked some white out of the background with some chalk ink in Alabaster, and added a gem, for bling, as an earring.  Because this was taken from a sewing pattern, it seemed only right to add some stitching and buttons to complete the feel.  Even the ribbon is stitched!  I really like this card, particularly as, halfway through, I didn't think it was going to come out well. Just shows, sometimes your mojo just needs to wander a bit!

Happy crafting.

Photobucketxx

'Here Comes The Sun'

This week, Daring Cardmakers are challenging us to create 'cards full of reds and oranges and yellows - or with lots of circles on them - or rays - anything that says sunshine to you!'  And they are right, we seem to have been in winter for so long this time and we are all desperate for spring to be sprung, aren't we? 

I'm in love, as always, with Cosmo Cricket and their new release 'Garden Variety'.  The bold fresh colours scream spring and summer sunshine so it seemed only right that these should be the basis of my sunshine card:


Image: Heather Ellis, 'Pure Innocence 6'
Papers: Cosmo Cricket, 'Garden Variety'

This little darling was coloured with my Copics - ain't she a sweetie!?  I cut her out with my square Nestabilities and added a scalloped square in red to make her pop.  I used some nice red stitching on the layers (note to self, learn to stitch in a straight line!) and a big red bow.

So, I'm off to link her up, before I forget (which has been known).

Happy crafting.

Photobucketxx

Friends Forever

We had a great afternoon yesterday, spent with good friends and their delightful 13-month old daughter, who is an absolute joy.  We so enjoyed having them with us and we are so lucky to have such lovely people in our lives.  Good friends are such a blessing, don't you think?

The Cupcake Craft Challenge this week is 'Friends':  'You can make anything you like this week as long as we can see 'friends' or 'friendship' in your project...', and Sweet Sketch Wednesday provided the ideal sketch for my card:


So here is my take on these two challenges:


Image: Free download from 'Digital Two for Tuesday'
Papers: Cosmo Cricket, 'Earth Love'

I coloured this image with my Copics and added background with my Prismacolors. 

Can't stay long this morning as we've tons to fit in today, but I didn't want to miss the deadling for the Cupcake challenge.

Happy crafting. 
Photobucketxx

Friday, 26 February 2010

A Special Birthday Project

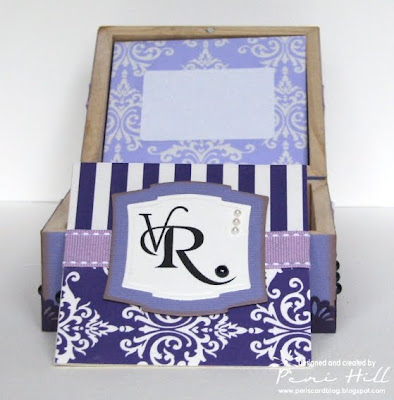
My friend, 'C', celebrates a special birthday next week, on the day after my own birthday (and no, I'm not going to tell you how old either of us is!).  She is a delightful lady and is a lover of Victorian gothic.  I wanted to make her something a little special and personal for her birthday, so this is what I came up with.


Papers: box covered in Bazzill (although I took the label off before I recorded the colour!)
Flourishes and stripes are digital papers by Pink Petticoat, 'Just An Old Fashioned Girl' mini kit, and 'Stripes' colour collection papers. I recoloured the papers a little, to get the deep, dark purple I wanted.

The monogram represents C's surname, which is Von R......., and I made this quite simply in MS Publisher by placing each letter in a text box and then moving them around until I was happy with the result.  The letters are in different fonts, because I couldn't find a 'v' and an 'r' that I liked in the same font! 

Unfortunately, I haven't been able to quite capture the colour of the base purple - suffice it to say that all the elements are much more co-ordinated/tonal (including the ribbon) on the original.  Ho hum!  But you get the idea.

I punched a border from dark purple Bazzill with my Fiskars border punch and added black pearls for detail. 

Inside the box is a set of monogrammed small cards, tied with a purple organza bow, and co-ordinating handmade envelopes, as you can see in the lid of the box in the second photograph:


I also added a ribbon in the bottom of the box to facilitate getting the envelopes out.  This comes from my book-binding days, where a ribbon would be attached in the base of a presentation box to enable the book to be lifted out without damaging the spine.  The ribbon is glued under the base covering and then lies across the base of the box, with enough left to fold back over the envelopes.  Pulling on the ribbon will lift the envelopes up out of the box, for easy picking.


I'm really pleased with this project and, best of all, I know that C will be absolutely thrilled with it.  All I have to do now is be patient until it's time to give it to her, and, as you may have noticed, patience is not one of my virtues! 

I'd love it if you would leave a comment as I'd be interested to know what you think of this project.

Happy crafting.
Photobucketxx

Thursday, 25 February 2010

Woooooooo!

I know I've posted twice already today but I just had to tell you - I've been featured on Little Red Wagon with my entry for challenge #16 - Ribbon.  I'm just thrilled! 

I now have a new blinkie to celebrate my success.  Thank you so much - I feel like I've won an oscar!

Hugs :-)
Photobucketxx

It's Mo Time!

This is my second post today, but I couldn't wait until tomorrow to post a new Mo! Obviously, it's Mo's Digital Challenge time again and this week's challenge (the last one set by Dawn Burnworth and the final one in the DT call) is a sketch:


Wooo, when I first saw this layout I was taken aback and wondered if my mojo would be up to the task. But I'm very happy to say that, in fact, this was an easy card in the end!


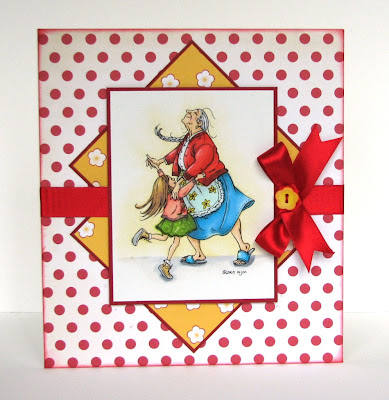
Image: Mo's Digital Pencil, 'Mummu and Me'
Papers: Cosmo Cricket, 'Garden Variety'

Of course, darling Mummu had to be the star again and this image makes me smile.  It reminds me so much of fun times with my grandmother and evokes so many happy memories.  So this was a happy card to make, even though Grandma isn't with us any more.  She would have been so thrilled to see all my recent creations.

I needed to use 'happy' papers with this image so I chose Cosmo's 'Garden Variety' for its bright colours and simple patterns.  I coloured a little flower button with yellow Copic and edged it in red to make it pop. 

I coloured this image with my Copics - I'm very proud of myself because this was my first large image with them.  They give such lovely depth of colour.  The paper I've used was another brilliant find at my local paper outlet.  It is supersmooth and takes the Copics better than anything else I've ever tried.  It has a faint narrow stripe on the surface (although it isn't textured) which gives an illusion of wall/floor surfaces under the Prismacolor 'glow'.  I shall have to hurry back and stock up on this one, too, before they sell out.  They've some brilliant papers in stock at the moment and I'm such a paper freak!  My mum and I call ourselves 'The Paperstrokers' - we soooo love paper.  In fact, it's a wrench having to use my favourites to make cards sometimes.  Both mum and I find a strange sort of mesmerising comfort from just looking through our paper collections - all the pretty colours and patterns - very soothing (and slightly worrying, actually, now I've written it down!). 

I'm so glad I managed to get this made and photographed before the light fades today as I'm anxious to get it linked up over at Mo's Digital Challenge.  So, I'm off to see if Mr Linky is still playing nice.

Happy crafting.

Photobucketxx

Crazy 4 Challenges - Who, Me?

Last week I entered the most challenges yet and I've thoroughly enjoyed myself.  Today is Thursday, so there'll be a new Mo's Digital Pencil Challenge and off we go again.  So, here's my final challenge entry for last week (bearing in mind that my crafty week starts on a Thursday!).

These cards were made using the Crazy 4 Challenges sketch.  I must admit, they were also a great excuse for using my new Cosmo Cricket 'Material Girl' papers.

Here's the sketch:

and here's my entry:


Images:  Little Grey Bungalow, vintage fashion drawings (this isn't a craft site but it has some wonderful information and images)
Papers:  yup! Cosmo Cricket, 'Material Girl'.  I'm ordering more as we speak - I've a feeling I'll use them up quickly!

I just love these 1950s fashion drawings.  I think they're illustrations from sewing patterns.  They are perfect with the 'Material Girl' papers, don't you think? If you look carefully at the background card, you will see that it has a very light grid marking.  I found this at the local paper mill outlet and it works perfectly with the 'Material Girl' papers: I think it gives the project a real 'fashion designer' feel. 

I have another three or so images in this range so expect to see more!

Yesterday I promised a sneaky peek at my latest project, so here it is.

I've managed to take photographs now (obviously) and I'll be posting the whole thing soon, so don't forget to check back if you want to see the finished result. 

By the way, I'm delighted to see that I now have 10 followers - thank you, everyone, for your interest and encouragement - much appreciated.  Maybe I'll 'do a Mo' and offer some blog candy when I reach 20!  I'll have to make plans!

Right, I'm off to Mr Linky!

Happy crafting.
Photobucketxx

So Many Challenges, So Little Time!

I've had to limit myself or I'll end up with challenge-overload, and I don't want my mojo to run away and hide again.  This week (and my week starts with Mo's Digital Challenge on a Thursday!) I've managed Mo's, Raise The Bar, Little Red Wagon and now, CPS Card Sketches and Daring Cardmakers.  There's only Crazy 4 Challenges to go (and I'll post that one tomorrow) and then I start my next week, with Mo!

So, the details:

As always, CPS is a sketch challenge:


and Daring Cardmakers' theme this week is 'Winter birthday cards'.

Here's my offering:


Image: Heather Ellis, Pure Innocence 2
Papers: Cosmo Cricket, 'Jolly By Golly', mini book version.

I coloured this cutie with my copics, swiped a little pale blue chalk around her and glittered her very lightly around the edge of the mat.  A few square gems add sparkle and she's ready to deliver her 'Warm Winter Wishes'.

I used a rectangular image instead of a circular one, so it's not absolutely true to the challenge.  But I wanted this little one to be a full image, as she is being very clever balancing all those presents!

I've been working on a special project over the last couple of days and I'll post it in full when I've had a chance to photograph it.  I think you'll like it!  It has been a mini labour of love and I've had such fun, especially as I know the recipient will be soooo pleased. 

Right, I'm going to take some indigestion remedy now - I've terrible 'indi-flaming' (as my mother calls it) and I feel really nauseous.  I hope I've not picked up the latest 'yucky' going 'round, which is a nasty tummy bug.  Unfortunately, having just had a bad flare with my RA, my immune system is having trouble recovering.  Oh hum! 

Anyway, I'll be back tomorrow with my final challenge for this week and a sneaky peek at my special project.

Happy crafting.
Photobucketxx

Sunday, 21 February 2010

Two Challenges, One Project

Over the last few months of blogging, I have learnt so much and I'm delighted with my blogging progress so far.  And I must (immodestly) admit that I think there is real progress with the stuff I'm creating, too.  I've gone from simple colouring and layouts to using my Prismacolors, and now my Copics, to much greater effect.  I've learnt how to use designer papers more effectively and to practice with layouts.  I think, more than anything, I've learned not to be afraid to have a go. 

One of the biggest things for me has been being brave enough to enter the online challenges and I've not only had fun creating my entries but had the most amazing feedback from all you wonderful Crafty Bloglanders.  I can't begin to tell you how much it means to receive your lovely comments and a big thank you to you all.

And now I'm learning to combine challenges, although I don't think I'll ever submit one item for more than two challenges - that way I can make sure I'm hitting the mark, as it were, with the challenge requirements.  My brain would explode if I had to take more than two challenges into account, I think!

So, today's post is a project I have made for both the Little Red Wagon challenge and the Raise The Bar challenge this week.  Little Red Wagon wanted us to use ribbon (not a problem at all!) and Raise The Bar, the crafty devils, 'barred' us (get it?!) from using any stamps whatsoever.  Scary!

This is what I came up with:


Sentiment:  my own, I think, printed along with the digital papers.

Papers:  construction in digital papers from MJV Forever Memories (and I'm sorry, I don't know where I downloaded it from) and from Correen Silke's 'Tea on Tuesday' from Computerscrapbook.com.

Flowers made by layering various flowers cut from a Making Memories paper.

Without a doubt, this is a sentiment I wholeheartedly agree with!  I don't know how it came to me (and I apologise if I have absorbed it by 'blogmosis' without realising it) but it is so true.


The inside chocolate holder was created following the basic concept of the 'Pull Up Treats' tutorial on Splitcoast Stampers.  I've been using variations on this theme for months now as it is a really lovely way to make a bar of chocolate into a lovely little gift.  So I used this as a basis for the above project.  Obviously, there's plenty of ribbon there (although most of it is hidden, I'll grant you) and there's no stamping at all.  The sentiment was printed along with the digital papers, using MS Publisher to facilitate placement, etc. I just touched up the white text on the outside flap to make it stand out a little more, as there was some minor bleeding with the dark brown colour.
So, two challenges with one project and I'm a very happy bunny.

Back soon with a couple of sketch challenge entries.

Happy crafting.
Peri xx

PS: 'Blogmosis' - absorbing ideas from other people's blogs without realising it and reproducing them thinking that you are a genius for coming up with them!

Friday, 19 February 2010

Mo's Digital Challenge #19 - Clean 'n' Simple

Every week (sometimes every day!) I spend time with a piece of card, some patterned papers, ribbons, buttons and all manner of colouring implements and wait for the creative fairy to visit.  Sometimes she comes quickly and before I know it a card has made itself right in front of my eyes.  Other times she dithers about a bit, undecided whether to drop in or not, before grudgingly sweeping by for just long enough to kick me up the mojo and flying off again.  But this week, Dawn Burnworth has really upset the crafty fairy by deciding to challenge us to keep it simple.  No papers, no embellies (save a single ribbon), just clean and simple.

Use white or cream cardstock, your image from Mo's Digital Pencil, and one ribbon.. it's that simple... and, no additional layers!

 Anyhoo, the crafting fairy has stomped home in disgust so I had to manage this one all on my own!  
 

Image: Mo's Digital Pencil, 'Young Love'
Papers: white cardstock from my cupboard!

I love this image and have been waiting for a reason to colour it.  For this challenge I wanted an image that would stand on its own and look happy to be there.  This one is perfect, don't you think. I coloured with my Prismacolors, although I wish I'd had the courage to try my Copics on this one.  Perhaps when I've bought my next set and have a few more colours to go at. I don't have many mid-tones and although I know I can do clever things by picking up a darker colour on a lighter nib, etc., so far it's only theory and I've not yet practiced.  All in good time.

I punched the edge of the card with my Martha Stewart border punch and threaded some ribbon through. And there you have it - simple!

Off to Mr Linky then and to check out the other beautiful creations that have been submitted.

Happy crafting

 xx

Wednesday, 17 February 2010

Daring Card Makers Friday Challenge

Well, I've done really well this week and entered more challenges than I thought I had time for.  That extra day off came in handy and I've thoroughly enjoyed spending time creating. 

This week's Daring Cardmaker's challenge is 'Have a Heart'.  All entries must include a heart somewhere - big, small, the main focal point or less obvious, it doesn't matter as long as it's there.  This was pretty easy for me, really, as most of the Pure Innocence digi stamps have a little heart somewhere, so it was an obvious choice to use yet another of these little sweeties - and here it is, with three hearts, for good measure:


Image: Helen Ellis, 'Pure Innocence 1'
Papers: Cosmo Cricket
Additions: Lomiac Card Layer LL2108 (see below)

I coloured her with my Copics and cut her out with my square Nestabilities; I left the square in the die and sponged on some light blue chalk.  She was then matted on to blue and the sentiment was attached.

Now this is a slight departure from my usual cards because I have used a card layer as part of the layout.  I'd never come across these card layers before, nor the company who makes them, Lomiac; I bought these on a whim at a little craft shop in Whitby, Daisy Crafts, which is in the covered market. Each pack contains five ready cut A6 card layers (usually in white or cream only) and I just wanted to 'have a go' with them, really.  This one is probably over-glittered, now I look at it again, and I should have kept it plain I think but, hey ho, it's not a disaster, by any means.  Unfortunately, it appears from their website that Lomiac don't sell directly to the public, so you would have to find out where they are available locally, if you wanted to get hold of some.  Alternatively, the contact details for Daisy Crafts can be found here.  They only stock a few of the designs but it's worth a try.  I think these were about £2.00 per pack, so they're not cheap, but I'm glad I bought some. 

I covered the blank part of the card layer with patterned paper and matted that part only on to dark green cardstock.  The whole thing was then layered on to a base of blue.  I added glitter (toooo much!) and a bow and there she is - ready to go. 

Back later with more - I'm obviously on a roll!

Happy crafting.
Photobucketxx

Tuesday, 16 February 2010

One Card, Two Challenges And A Celebration

I must admit that when I saw the title of the Raise The Bar challenge this week, my heart sank a little.  I'm all Valentined out - there have been so many challenges on the subject of love and hearts over the last week or so (most of which I've not entered, as you will have gathered!) that the prospect of another of the same type almost pushed me over the heart-filled edge.  But when I read a little further I got a nice surprise:

BE MINE FOREVER
Okay, it sounds corny but really it has nothing to do with a significant other! This week's challenge is to use a stamp/set/item that you will never ever ever sell or give up. Ever.

Aha! Now that one I can do, without any difficulty whatsoever.  Although I have many wonderful stamps and digi-stamps, my heart has been captured forever by the brilliant Mo Manning of Mo's Digital Pencil and it is her glorious digi images that I simply could not live without.  Additionally, today Mo is celebrating her first six months of digi stamps AND reaching a massive 1,000 members on her Papercraft Planet group - and she deserves every bit of celebration that her followers can throw at her.  She's such a generous and talented lady, so this card is not only my Raise The Bar challenge entry but my way of celebrating and thanking Mo, too.


The inside of this card reads: "... but you shine the brightest!"

Image: Mo's Digital Pencil freebie, Papercraft Planet group
Papers: Rusty Pickle - but I've had them ages!!!

In addition, this card is for the CPS Challenge #154.  This week's sketch was:


It was perfect for the idea I had in my head for this card, and with a little adjustment I've managed to follow the sketch quite well, I think.

So, there'll be one more challenge to show you tomorrow (Daring Card Makers) before I start on this week's round!  Gosh, I'm a busy bunny - but I love it!

Happy crafting.

Photobucketxx

Allsorts Challenge Week 39 - 3, 2, 1 (Go Mojo!)

The Allsorts Challenge Blog have a fun challenge this week: 3, 2, 1.  Your entry must have three of one thing, two of another and one of a third.  Other than that, you're free to use whatever you want, so here's my entry:


Image: Heather Ellis, 'Pure Innocence 7'
Papers: My Minds Eye / digi paper, part of Correen Silke's 'Tea on Tuesday', available from Computerscrapbook.com

And my 3, 2, 1 recipe: three patterned papers; 2 hearts (look carefully!) and one button.

 Again, another cutie from the Pure Innocence range - I love their simplicity and child-like quality.  All together now:  Aaaaaaaaaaaaaah! I coloured this one really simply with my Copics and, because I enjoyed working with the Stamping Bella colour challenge colours this week, I continued the pink, orange and turquoise theme just a little longer. 

So I'm off to Mr Linky her at Allsorts.  Will be back soon with more challenge entries - it's been a bumper week this week!

Happy crafting

Photobucketxx

Monday, 15 February 2010

Bellarific Friday - Colour Challenge

So, I got myself all ready this week to enter the Bellarific Friday challenge for the first time. Unfortunately, Stamping Bella's blog seems to be experiencing some problems at the moment, so I couldn't find the details for this week's challenge. Thankfully, Linda Heavens of Heavens Created This (you should check out her blog, it's wonderful!) had posted the details on her blog, so I was at least able to create my Bella whilst my mojo was working.

This is the colour challenge:


Now, this particular one isn't difficult for me - these are some of my favourite colours at the moment and I have several papers I could use that will fit well with the turqoise, orange and pink theme.  I chose 'Ivy Ketto' as my image - she's a little sweetie.  Mind you, I'm not used to working so small; because I use a lot of digi stamps, I can make the images any size I want and I'm out of the habit of working with rubber, at a specific size.  It certainly makes it a challenge to use my Copics!  Anyway, this is the result:


Image: Stamping Bella, 'Ivy Ketto'
Papers: My Minds Eye - part of a pack that was free with one of the craft magazines - I love them.

Isn't she adorable?  I stamped her on to my usual Copic cardstock (which is nothing flash, just cheap stuff bought locally, but it seems to work well) and coloured her up.  I then used my label 3 Nestabilities to cut her out and to cut and emboss a frame in dark turqoise Bazzill.  I then matted a piece of floral My Minds Eye on to a piece of dark orange Bazzill and sewed around it with a straight stitch. Then this whole thing was layered on to another piece of My Minds Eye and finally on to pale turqoise Bazzill. Some more stitching and the base was ready for Ivy Ketto.  I added pink ribbon and a bow, plus a few pink crystals for show and there she is! 

Anyway, I've e-mailed her off (since I seem to remember this is how to enter the challenge, in any event) and hope to see her in the challenge gallery soon.

I'm still waiting for the carpet man to turn up so I've plenty of time to make something else!  Yaaaay! I'll be back later with the next creation.

Happy crafting.
Photobucketxx

Sunday, 14 February 2010

Pure Innocence and The 'Envelobox'

Happy Valentine's Day!  That means we're already half way through February 2010 and time is passing quickly.  I notice that all the shops now have copious amounts of Easter eggs for sale and, of course, Mother's Day gifts and cards.  I don't know about you, but I sometimes feel a little bullied by the retail industry into moving at their pace, not my own.  This was particularly so when Daughter was younger - I didn't want to buy school uniform in June, when she hadn't even finished the school year;  I wanted to buy it in August, a month before she went back to school, when she'd done her summer growing.  But no, the retailers said we had to buy it in June or July and by the time August came around, the shops were bare and full of the first Christmas supplies of the year.  Oh hum, I'm turning into a grumpy old lady.

But one thing that doesn't make me grumpy is the wonderful work of Heather Ellis, creator of the Pure Innocence stamp/digi stamp range.  Who could fail to be captivated by these little cuties?  So today's card is Pure Innocence 10, and what a sweetheart she is.


Image: Pure Innocence 10, Heather Ellis
Papers: Cosmo Cricket, 'Earth Love'

I coloured this little cutie with my Copics, layered her on to brown Earth Love and then onto a pearlised salmony-pink.  I used my Martha Stewart edge punch to pretty up a piece of brown card, added a couple more strips of Earth Love and a big satin bow before laying the lot on a background of Earth Love salmon-pink pebbles.  A final button flourish and there she is.  So sweet.

Despite having a lazy Sunday, I found time today to write up the template and instructions for the little box I made yesterday to hold the set of vintage cards.  I've decided to call it my 'Envelobox'.

This template isn't a 'print and make' template, however, because I wanted to give you the ability to change this template to match any size of card you want. Here's the basic idea: 


I've also produced some proper instructions (which are a bit long to post here) and you can get these by following this link

The great thing about this template is that it can be used for any size of card by applying some simple rules for measurement.  It could be used, as I did, to make a holder for a set of cards; it could also be used as an envelope for a 3-dimensional or heavily-embellished card, as long as it is made from sturdy cardstock. It would work equally well to hold a set of coasters or a chocolate bar - you choose!

Let me know if you like it by leaving a comment - better yet, let me see what you've made with the template.

Right, it's time for a bit of TV, a cup of tea and bed.

Happy crafting.
Photobucket

A Little Gift

Now, before I start this post, I must warn you that the following photographs are possibly the worst I have ever taken - even worse than my first attempts.  My excuse, you ask? Well, I made this little gift today to give to friends when we went to see them for dinner tonight.  And I was very pleased with the result, too, as were they.  In fact, I don't think it would be too far to say that they were delighted.  BUT (and here's the excuse), I suddenly decided I had to record everything before we went out and it was well past any chance of natural light for the photographs.  So I used artificial light (yeuch, too yellow) and I have to admit that the photographs were taken in a great hurry.  Remember this (and forgive me, please) when you see what I've posted.

So, the idea was to give a small pack of hand-made cards to our friends and I wanted to use some beautiful vintage images I'd downloaded from Digital Two for Tuesday and jazz them up a bit with modern sayings. And I wanted to make a cute little box to keep the cards in, too.  This is what I came up with:

All images: Digital Two For Tuesday
All papers: My Minds Eye

This is the little box, only 11 cm  square (roughly) and 1.2 cm deep, secured with silver ribbon.


And open:


The collection of five cards - soooo out of focus and nasty yellow light!


And the five cards separately - again,bad photographs but you get the idea!


As usual, I so wish you could have seen them for real - they were really cute.  The cards were only 10cm square, so that was a challenge for me in itself.  I'm not used to working so small.  But I think I might do it again, as the cute factor is definitely worth it.  I think I'll repeat this series, perhaps moving some of the 'punch lines' to an insert to save space on the front of the card.  See, each project is a learning curve.

The little box was so easy to make - the main thing was to make sure I measured well and allowed sufficient room for the cards and envelopes to fit in easily.  I had to use a piece of A3 card as the whole thing wouldn't fit on to an A4 and I didn't want to have to join pieces.  Essentially, I treated the box like a deep envelope, I suppose - maybe I'll post a quick template and tutorial tomorrow.  The nice thing is that the box can be made to fit most sizes of cards, just by tweaking the measurements as appropriate.

It's such a shame that the photographs are so dreadful but I hope you get the general idea.  I've decided that I shall make more of this sort of gift this year, for all those moments that you need a little something to give.  I'm also going to be making some more shopping lists and notebooks, and I have a cute journal just waiting to be given 'the treatment'.  I'm going to get some more little boxes made, too - filled with chocolates, they make a lovely table present for special dinners or a darling little gift for a chocolate-loving friend.  Aaaaah - I love it when my mojo runs wild!

Anyway, it's late and I need to sleep - although I've drunk so much cola today I'm on a caffeine high!

Watch out for the template and tutorial.
Happy crafting

Photobucketxx