Saturday, 8 May 2010

Boxing Clever

Every now and then I come across a challenge that really inspires me and one such this week was the Project Tuesday challenge to make an altered box or tin.  I love boxes - I used to make them, boxes for books, for photographs, for albums, for storage - and, in fact, a large wardrobe-style leather covered jewellery box, complete with inserts, pewter door panels and mahogany knobs (all made by me) for my mother's 60th birthday, a few years ago.  (If I can find photographs, I'll post them - it's awesome!)

So I was delighted to have a go at this challenge and here's the result:

Papers: October Afternoon

Other: Small wooden box; 7 Gypsies measuring tape self-adhesive ribbon; buttons, pins, etc., from stash

I started off this project by trying to decide what I would put in the box.  My last box had been a small gardening-related project and I didn't want to repeat the theme.  So I decided that this one would be a sewing box, for the essential sewing kit, perhaps for Daughter to have in her room at university. 


I began with a small wooden box, similar to this one (because I forgot to take 'before' pictures!!!).  My version has a clever little magnetic catch on the inside lips at the front of the lid and base and, therefore, there's no bulky catch to worry about - much easier to cover. I gave the box a light sanding all over to make sure that it was smooth and then coloured all the edges, the inside lips of the top and base and a thin band around the outside top of the base, using a black Copic marker, chisel end. 

I chose co-ordinating papers from the October Afternoon 'Thrift Shop' collection and teamed it with punchy red for a good contrast.

And then I just let myself do whatever felt right - I can honestly say that there was no real plan for the decoration. 

However, when I considered the inside of the box, I thought it might be nice to incorporate a pin cushion into the lid.  So I drew a template by drawing around the outside of the lid onto plain card and cutting it out.  Then I took my compass and pencil and, using them a bit like calipers, measured the lip of the lid.  I placed the pencil of the compass on to the card and the needle of the compass tight against the edge of the template and gently ran around the whole template, trying to make sure always to maintain the needle at 90o to the template, until I had marked an even amount around the edge of the template.  I then cut off the strip I had marked out, leaving me with a template that (mostly) fitted inside the lid of the box.  I was able to use this, then, to cut out a piece of foam, which I covered in black felt and stuck (snugly) inside the lid.  The photograph above shows the inside of the box (with the lid resting on the table top) and the pin cushion nestled inside the lid.

And this is the pin cushion in the lid with the box open in the proper position.  I intend to fill the box with basic sewing stuff and hope that Daughter will like it as much as I do!

So, it's late (again) and we've had a long day.  Picked my parents up from the airport today, as they've arrived home after their month-long trip to Australia, looking very well and very relaxed!  Needless to say, there was lots of news to exchange so we stayed for dinner and then it was suddenly 9.00 p.m., time to come home and get everything ready to post.  I'm pooped and off to be, where I shall be sleeping in in the morning, with no alarm to wake me!  Bliss!

Happy crafting.
Photobucketxx

Wednesday, 5 May 2010

Kissy Kisses

Just a quick post tonight, Crafty Bloglanders, as I have sooooo much to do at home, after a busy day at work and I'm pooped! 

Every now and then, it's good to try out a new challenge.  I love my regulars but it's exciting to be among new and different groups of crafters.  So this week, I'm going to enter the Charisma Cardz Challenge, where the theme is 'Girly with flowers'.  Now, who doesn't like to make girly flowery cards?  So here's my entry:

Image: Mo's Digital Pencil, 'Kissy'

Papers: October Afternoon, of course

Tools: (need I say?) EK Success Retro Flower punches.

Isn't Kissy gorgeous?  Such an absolute cutie and those lips!  I love this new image of Mo's (mind you, I love Mo, as you all know) - she reminds me of Daughter when she was little - all pink cheeked and pretty.

I'm desperately in love with my October Afternoon papers at the moment (in case you hadn't guessed! Ha-ha) and these beautiful bright yellows caught my eye.  Mixed with those luscious blues, it's a perfect combination.  And, of course, there are flowers galore here - the DPs, Kissy's little bouquets, and my groovy retro blooms! 

I coloured Kissy with my Copics, adding shading and grounding with my Prismas, to give a lovely soft yellow glow around the image.  I have to say that she was just a delight to colour - really good fun, a bit like dressing up a doll.  I could colour her again and again (and probably will!), in different shades. 

Her crown has a coat of clear glaze pen and a trio of baby gems.  I used white gel pen between the flower of her bouquets and dusted with Glamour Dust whilst the ink was still wet, which saves having to pick out with glue.

A touch of pink just lifts the blue and yellow colour scheme, which is heavily repeated in the flowers, which have been punched from the various DPs I've used, combined with a little dark blue, to give some really popping flowers.

Just how girly can you get!?

Happy crafting.
Photobucketxx

Isabella's Challenge - My First DT Card

Hello and welcome to my bit of Isabella's Challenge DT inspiration.  This week, Isabella is challenging us to make a card in honour of mothers, as it will be Mother's Day in the US on 10 May, which is next Sunday. 

Image: Isabella's Sketchbook, 'Notecard Digi Stamp'

Papers: October Afternoon

I wanted this card to be really simple and to let Isabella's image be the star, so I chose these subtle complimentary papers by October Afternoon and then concentrated on making the image the star.

First of all, I paper-pieced the ribbon and added a little shading with my Copics.  Then I coloured the rest of the image, picking up the colours from the background paper I had chosen.  Strangely, this is one of the very few cards I have made where I have chosen my DPs before rather than after I have coloured.
Once I had finished colouring and I had added the 'Mum' to the centre of the frame, I cut around the image, without leaving any border (except for a tiny amount around the berries, which would probably have fallen off if I'd tried to cut any closer!) and then mounted the whole thing on sticky pads to give it a little pop.  For a little subtle bling, I used plenty of pearls around the image.

If you haven't been over to Isabella's Challenge yet, why not pop over and take a look.  The challenge runs weekly, every Wednesday, and you'll even find a freebie on the Challenge Blog's side bar, just to help you get started.  So play along for a chance to win two free images from Isabella's Sketchbook - you'll have such fun choosing from all the beautiful images she has to offer.

Can't wait to see what you'll create!

Happy crafting.
Photobucketxx

Tuesday, 4 May 2010

With Sympathy

Sympathy cards are some of the hardest to make.  They have to take into account the sadness of the occasion yet somehow reflect the relationship between you and the recipient and, of course, their dear departed.  So it was with some trepidation that I returned to the Little Red Wagon challenge and their 'sympathy' theme this week.

But, as often happens, I realised that I needn't be worried about this delicate theme at all - after all, a sympathy card doesn't have to be dour or bland - and this is what I finally settled on:

Image: Isabella's Sketchbook, 'Waiting'

Papers:  October Afternoon, 'Thrift Shop'

Tools: (altogether now .....) EK Success Retro Floral Punches; Floral Punch leaf spray.

I love the gentle sadness of this image and I think it is perfect for a 'thinking of you' card.  If I was ever in the unfortunate position of being the recipient, I would be happy to know that special thoughts were coming my way.  I love the gentle colours and simple layout of this card and it gave me much pleasure to make it, almost envisaging it bringing some love to a troubled friend. 

Ooooh, sorry, got a bit deep there!  So, on to the practical stuff.  Coloured this image up with my trusty Copics and added some shadow with my Prismacolors.  It was easy to choose co-ordinating papers from my October Afternoon collection so there was no big decision needed there.  Then it just sort of made itself - that's why I'm so pleased with it.  Any card that kind of jumps on to the paper without too much thought always feels 'right'. I think the double matting behind the image really picks up and brings together the whole colour scheme.

Finishing touches were a couple of punched flowers and leaves, a nice rich blue ribbon and bow, a simple sentiment and a few pearls and there she was, done. 

I've missed the Little Red Wagon challenge for a couple of weeks now and I feel honour-bound to return.  It is one of my favourite and most regular challenges and it is only that life has got a little in the way that I've missed it for a while. 

Had a busy(ish) day today, if you can call eating lunch at our favourite bistro, followed by afternoon tea and scones at our favourite lavender farm being busy!  Yummy!  Still, all the fresh air we managed to get in between has certainly tired us out and it will have to be early to bed tonight so that I'm ready for work again tomorrow.  Don't even the long weekends go by so quickly?  I need to win the lottery (or at least buy a ticket)!

Happy crafting.
Photobucketxx

It's A Man Thing

Well, what a hectic few days I've had, hence my absence in Blogland.  I popped down to see Daughter at uni on Saturday and Sunday - we had a girly sleepover in her room in halls and had much fun!  Lots of chatting, plenty of chocolate and loads of hugs.  So I've been colouring like mad today to make up for it and I'll hopefully have quite a few cards to post here in the next few days.

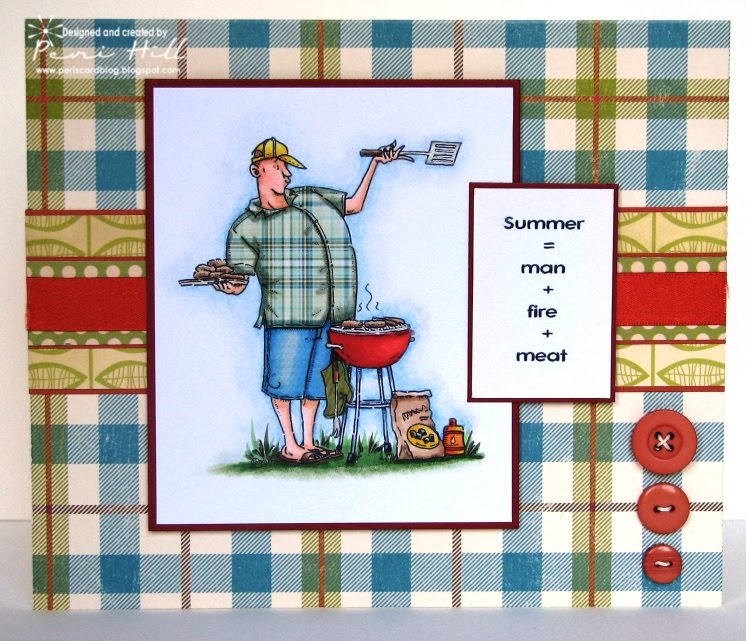
Today I want to show you a card I've made for Mo's DP2 Challenge, which this week was, horror of horrors, masculine!  But then I remembered that Mo has recently introduced a brilliant range of images called 'Big Guy', so it was no trouble at all to come up with something suitable.


Image: Mo's Digital Pencil, 'The Big Guy Grilling'

Papers: October Afternoon and Cosmo Cricket

Summer (often a strangely absent season in the UK) is BBQ time in our house.  Out comes the grill and any opportunity to fire it up is pounced upon.  My OH is very good at BBQ and we both love a nice salad and some BBQ meat and/or veg.  In fact, for many years, Daughter has chosen to have a BBQ party for her birthday and even her 18th was celebrated with a very large BBQ, with champagne!

So when I saw this image in Mo's 'Big Guy' range, I had to break out my Copics and colour.  I paper-pieced his shirt and shorts, and just used my Copics for a bit of shading.  Once complete, I used my Prismacolors to add the 'glow' and grounding and matted the finished image on to a dark red background.  I used October Afternoon for the background (check) and scraps of Cosmo Cricket for the band and printed out the sentiment on my PC.  I added three buttons because even man cards need embellishment and then I was happy to stop playing around.

If you haven't yet had a look at Mo's 'Big Guy' images, treat yourself by stopping by her store here.  You couldn't wish for anything better for the men in your life! 

Well, it's just past midnight (again!) and although I'm not back at work until Wednesday (which is now tomorrow), I really need to get some sleep.  I'm getting too old for all these late nights, methinks!

Happy crafting
Photobucketxx